Friday, May 25, 2012

Illustrated Shoes


The other day on Pinterest, I came across a site called Figgie Shoes where the owner paints custom designs on shoes (heels / flats for weddings, baby, etc.). I had to try it *immediately!*

I think the artist at Figgie Shoes uses a paint brush, but I am not as skilled in that arena so decided to try it with ink and paint pens instead. Off to Joann’s I went and picked up this set of pens (fine and regular point on either end) as well as a white Sharpie branded paint pen. Then I went to Goodwill for some shoes.


On my practice pair I started by freehand drawing with orange pen. I think these particular shoes are made of a sort of faux leather. The ink took to the material nicely. At first I thought it looked nice and subtle – you could barely see the design. Then I decided I wanted the design to stand out more so I went over it with the white paint pen.

The orange bled into the white, making for a sort of mixed-color effect. It wasn’t bad, but for shoe #2 I opted to start out with white alone. I prefer the white by far! What do you think? Someone told me the design on these reminded them of henna tattoos (something else I want to try). I take that as a compliment!

After the above pair, I was itching for more. I dashed down the hall to my 2 year old’s closet and found a pair of shoes I’d bought for her at Target that were a size too small. They still had the tags attached, and I hadn’t gotten around to returning them. Perfect! So I went for it on this pair with all the colors. White still stands out most, but the other colors look great too. I think it really turned out cute. I gave it to a friend who is expecting a baby girl soon. I didn’t get a full picture before so this is a small phone shot that she took.

I'm addicted now, so plenty more to come and with bigger and better photos! This is actually a pretty easy craft to try out. If you're nervous you could use a stencil. What do you think? Will you give it a try? If you do, link back to your photos because I want to see!

Friday, April 27, 2012

Embroidered pillow cases upcycled from clearance shams


I was at Bed Bath and Beyond the other day and found some clearance pillow shams marked down to $10 for a pair. They were sized for a regular bed pillow, but looked like they could be adapted to the size of a small square throw pillow instead. Namely, the throw pillows on my couch! I wished they were a tiny bit cheaper but the embroidery was so pretty and such high quality that they still seemed like a good deal. Aren't they cute?

On that same clearance rack I found an off-white sheet that had a drink spilled on it, marked down to $3. I figured if I couldn't wash out the spill there was still plenty of good fabric there to be worth the money. So I snagged that too. Good thing because I ended up needing to create a lining for the pillow cases and it was the perfect color. Incidentally, the drink stain washed right out so I ended up with a whole perfect sheet for a measly three bucks. Score!

Another handy thing about these shams is that the back was already set up with an overlapping envelope style opening. So that saved me the extra step of hemming those edges. I just cut off one end of the sham and hemmed up that side, being sure to keep a nicely centered opening in the back. I also trimmed the other three sides and hemmed those for a neat, even, perfectly sized case.

I'm loving how these came out!

Wednesday, April 11, 2012

Skirt for 4 yr old out of ladybug sheets

Hello blog, long time no see! A YEAR, in fact. :( I noticed the other day that someone commented on my glass etching post a year ago, asking a question, and I never saw it. I'm sorry about that! I'm going to try to find more time to work on this blog, and maybe even start an Etsy shop someday!
Anyhoo, on to my post.


I got a sewing machine for Christmas and taught myself how to sew and I LOVE it. My husband told me that I'm addicted, and I need an intervention. It's that bad :P

It's just such an amazingly satisfying thing to see a project come to life! The inspiration for this sewing spree was that I realized my daughters (2 and 4) are the perfect age to make adorable things for. I don't have to be an expert seamstress to make a few simple items, right? More posts coming on the *many* projects I've made in the last 3 months, but for now I had to show off this skirt!

How is this thrifty, you may ask? Well, let me tell you the story!

The other day my 4 year old noticed some cute ladybug sheets I had on the 2 year old's crib mattress. She wanted ladybug sheets on her big girl bed too! So for her birthday, I went to Target and bought similar sheets for her bed. They didn't have any twin sheets left in stock, but they did have full size, for the same price. Lightbulb! I figured, why not trim down the sheets to fit a twin bed, then use the excess fabric for some cute projects? So that's what I did.

Here's half the remnant that I cut off of the flat sheet...
Imagine this, twice as long, and you have what I started out with this morning. I trimmed it to the right size, and added some cute green fabric with white polka dots as a contrasting band at the bottom, and voila! Skirt!

I found the tutorial on a fun blog called, "Scattered Thoughts of a Crafty Mom" (found this on Pinterest).


She has 3 options of skirts there, and I plan to make them all. This particular skirt is the first one in the list. I can't wait to try it on my little one when she gets home from daycare!

Another shot on a hanger, just for kicks:

Lurve!

Wednesday, April 13, 2011

Round platter ... or something (decoupage)

Wow, it's been 6 months since my last entry. I apologize profusely to my one, maybe two, readers. :P

I have an excuse! Holidays took over, then we decided to start house-hunting...you know...just to get an idea of what was out there. Then on our 3rd trip out, we found the perfect house! So here I am. Three months into our new house (old house about to sell) and I finally have a second to breathe.

Like many crafters out there, I am in love with Goodwill. I want to go there an obscenely frequent amount of time. Here's something I picked up on a recent outing to my local Goodwill. A really cute little circular wooden platter. It's black, and would be just fine to use as-is, but I wanted to do something with it. I have some really pretty paper, so decided to decoupage the paper to it. Still not sure what this is, but it's pretty!

Here's how it went:

  1. Assembled my materials: platter, glue, paper, scissors, and pencil (added later: black paint and small paintbrush)
  2. Traced around the platter onto some gorgeous paper (I think this is Basic Grey, but am not sure)
  3. Cut out the circle
  4. Glued circle to top of platter
  5. It's hard to see in the picture below, but there is a slight indentation around the edge of the platter, where I put paper over top of the routered gappy area (official term). Much deliberation occurred...to cut, or not to cut?!!
  6. Decision made - I whipped out the old Xacto and went to town, cutting into the indentation
  7. My Xacto cutting skills apparently aren't up to par because I dug into the wood a bit as I went around.
  8. Easy to fix though! I just grabbed an old paintbrush and some black paint, and tidied things up
  9. It turned out really cute and is currently displayed on a little easel like you might display a fancy plate.
  10. I'm not sure this project is totally done...maybe I'll turn it into a picture frame, or put a chloche on it and display some cute stuff inside, or buy some clock parts and make it into a clock. Who knows?! If you have ideas, send 'em my way!


Wednesday, November 24, 2010

Halloween: Bats and Spiders, oh my!


A little late for a Halloween entry since Thanksgiving is tomorrow, but these were too fun to wait until next year to post! My 2.5 year old had fun creating these with me, though she was a bit heavy handed with that fun black paint. Blackest bats, ever!

Materials (Bat)
  • Toilet tissue tube
  • Black tempera paint and brushes
  • Black poster board
  • Googly eyes
  • Black felt (optional)
  • Elastic cording
  • Stapler
Materials (Spider)
  • Two sizes of styrofoam balls
  • Black paint and brushes
  • Toothpicks
  • Black pipe cleaners
  • Paper scraps
  • Thick gray yarn
  • Tape or tacks
Credit for these goes to the Disney Family Fun site. Full instructions can be found there:
Bats: http://familyfun.go.com/halloween/halloween-crafts/halloween-bat-crafts/hanging-bats-666166/
Spiders: http://familyfun.go.com/crafts/styrofoam-spiders-and-web-665473/

Glass Etching with stencils

Glass etching sounded so intimidating to me until I tried it. It's actually very easy! I created this whimsical dragonfly-etched champagne flute in less than an hour.

The shape of your glass surface is important. Don't make my mistakes :)
  • Easy = Flat (mirror)
  • Harder = Curved (tube)
  • Hardest = Sphere

Materials (Michael's carries all the etching things):
  • Glass (get a few, you'll want to do lots!)
  • Etching Creme
  • Stencil (special for glass etching projects)
  • Popsicle stick (usually comes with stencil)
  • Masking tape
  • Rubber gloves
  • Paint brush


  1. Tape your stencil to the glass and rub it with a popsicle stick until it sticks. You can see in the picture where some of the upper right wing is sticking and the rest of the stencil (dark blue) still needs to be rubbed onto the glass.
  2. Gently pull off the stencil backing, trying not to tear the blue stuff
  3. Cover accidental tears with tape
  4. Mask all around the stencil again (to keep etching creme from getting on the nice part of the glass)
  5. Follow directions in the etching creme box: wear your gloves, paint on the creme, wait, then rinse in water.
  6. Peel off any remaining tape and clean your final piece with glass cleaner


Sunday, November 07, 2010

Padded hangers

I whipped three of these babies out while watching a movie--quick and easy! I hate it when my sweaters get those pokey-corners in the shoulders from my hangers. I know, I should probably fold them instead of hanging, but I dunno, I like to have all my clothes hung up. It makes them easier to see or something. Many times I've thought, 'Gee, I wish I had a padded hanger' but was too cheap (lazy) to go buy some. Little did I know they would be such a snap to make and the materials are things I have already.


Materials:
  • Plastic hangers
  • Ribbon
  • Tape
  • Plastic bags

Directions:
  • Wrap the plastic bags around the hanger (all except the hook part)
  • Use tape to secure the bags as you go and try to keep the padding even
  • When you begin wrapping, leave a foot-long tail hanging loose
  • Start at the top of the hanger just below the hook area and start wrapping your way around
  • When you get all the way around, cut the ribbon so there is another foot-long piece hanging off
  • Tie the two "tails" into a pretty bow and trim as needed

Some Tips:
  • I used wire ribbon, but you might prefer non-wired (wireless? hee hee) so there isn't risk of your clothes getting snagged
  • My spool of ribbon was too big to keep passing through the middle of the hanger, so I cut it before wrapping.
  • I estimated the length of ribbon by measuring the three sides of the hanger and doubling that, then adding another two feet for the tails.
    By "measure" I mean I held the ribbon up to each side of the hanger. Actual measuring is WAY too much work for me =)
These are great to make for yourself, or possibly as a gift. If you sew items (clothes, baby blankets, etc...) for friends and family, it might be nice to make a matching padded hanger as part of your presentation.

Friday, November 05, 2010

Card variety pack

My mother is the queen of card giving and Hallmark gets all her business. Last year at Christmas, I thought it would be nice to switch things up, so I created a "pack" of 6 handmade cards for her. She loved them, but hasn't used any because she claims they are "too pretty". That's my kind of complaint!

No instructions here, just some card layout ideas if you want some inspiration.

I didn't feel like making my own envelopes, so I created all these cards to fit envelopes I already owned. They may not be perfect color matches, but instant mail-ability is important to Mom!

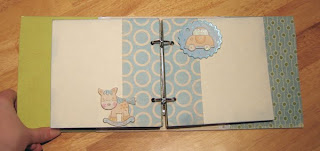
Chip, chip, HOORAY! Baby shower book.

Do you love chipboard as much as I do? I can't get enough of it lately.

Here's an album I made for a friend's baby shower. The idea is that the guests each write in their well-wishes or wisdom and Mom and Dad save the book as a keepsake. You could even add photos later if there's room.

I think I did something extra to the cover, but for the life of me can't remember what and, alas, didn't take any photos of it...use your imagination :)

Supplies:
  • Chipboard album with rings (every page should be chipboard, not just the cover). I used 6x6 size.
  • Pretty coordinating papers
  • Embellishments (I bought one sheet of baby boy 3-dimensional stickers and used every single one)
  • Ribbon
  • Mod Podge or some other glue that dries clear
  • Paper cutter or scissors
  • Sand paper
  • Hole punch
  • Chalk or ink (optional)

Instructions:
  1. Figure out where your paper will go and mark the spots where the holes will be. Punch these out.
  2. Glue paper to the pages however you wish and wait impatiently for it to dry :P
  3. Add ribbon to outside cover pages (and anywhere else you think is pretty)
  4. Sand edges of pages so the paper is smooth along all edges
  5. Use chalk or ink to color the edges and corners of the pages (optional)
  6. Add embellishments
  7. Put your pages in the album
  8. You're done! So cute.
Here are my less than stellar pictures, but you get the idea. I wish I had time to take photos in the day!